Table of Contents

Everyone loves the sound of a sprinkler on a hot summer day. But what happens when the sprinkler system breaks?
Hopefully, you’ll catch the problem before it gets too out of hand and you have to deal with a hefty repair bill. If not, you’ll want to know how to fix a leaky sprinkler as soon as possible.
Sprinkler systems are complicated, but fixing a leaky sprinkler isn’t too tricky. It might take some time and effort, but with the right advice and tips on fixing a leaky sprinkler, you can get things back in working order again with minimal stress.
What Is Causing The Sprinkler to Leak?
Leaky sprinkler heads are one of the most common sprinkler system problems. Fortunately, there are a few different things that could be causing it.
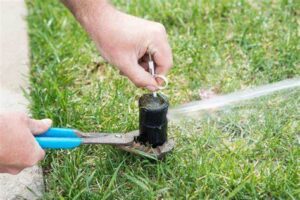
Most commonly, the issue is a clogged nozzle. You’ll know this is the case if you notice water coming out of the sprinkler head, but it isn’t reaching the lawn as expected. The easiest way to fix this is by using a small tool to poke out the clog.
Another common cause of a leaky sprinkler is a broken or worn-out O-ring. Water will start to see if there’s a split in the rubber seal. Unfortunately, a worn-out O-ring won’t be easy to spot. If you think this might be a the cause leak, you’ll have to take the sprinkler head apart to inspect the damage.
How To Fix a Leaky Sprinkler?
Find The Leak
The first step in fixing a leaky sprinkler is finding the leak. This can be done by using a garden hose with a spray nozzle to check for water spraying out of each sprinkler head, or you can look at the side of the house and yard to see if there are any wet areas nearby.
Turn Off the Water Supply
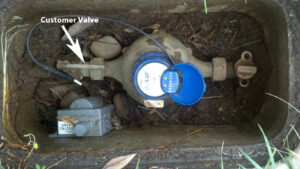
The first thing you’ll want to do is turn off the water supply. Turn off the shutoff valve if you can find it, or turn off the main water supply for the house if you can’t.
The shutoff valve might be inside a cabinet or under the kitchen sink. If it’s outside, there will probably be an obvious handle that turns with enough force to snap off in hand. Either way, make sure it’s completely turned off before moving on!
Replacing the Nozzle
To replace the nozzle, you’ll need to remove it. To do this, turn off the water supply at the home’s main shutoff valve and remove any sprinkler heads attached to the pipe where you want to replace the nozzle.
Once you have removed all those sprinklers, use a wrench or pliers to loosen up the nut holding the old nozzle. Then take out the new one and put it in place of the old one by screwing its threads onto the pipe so that it will connect with other parts of the system.
Soldering a New Section of Pipe
If a damaged pipe causes the leak, you can sell a new pipe section into place. To do this, heat the end of the pipe with the torch until it glows orange-red.
Flux is applied to both ends of the joint and allowed to cool for several minutes before soldering.
After joining the pieces with the solder, use water to clean off any excess flux that may have spilled onto the work surface or floor.
Replace the Entire Sprinkler Head
If the issue is continuous sprinkler head dripping, it’s likely time to replace the entire head. Here’s how:
- Use a wrench and screwdriver to remove the sprinkler head. If you don’t have these tools, you can purchase them at any hardware store.
- Grasp the new sprinkler in its packaging and pull it out of its box. Take note of what side faces up on the new head; this will be the side with ridges that fit into grooves in a sprinkler body or manifold.
- Hold onto the old sprinkler while replacing it with the new one, so they both face down in the same direction as when they were installed.
- Line up each piece, so they slide together easily, then screw them tightly into place using the wrench or screwdriver, if necessary, until all screws are tight and secure against one another without being too tight.
Once everything is in place and tightened securely, turn off the water flow at the main valve closest to the house before testing for leaks! If there aren’t any leaks after turning off the water supply completely (no sprinkler head dripping sounds), then turn back on the supply slowly.
Repairing a Leaky Sprinkler Faucet
If water is leaking out of the faucet’s threads, though, there is a need to replace the faucet. If the leak comes from the nozzle, you’ll need to replace the O-ring first.
Once you’ve fixed the leak, ensure it doesn’t happen again. To do that, ensure you’re using the right amount of force when turning the faucet on and off. If you’re using excessive force, the O-ring will be worn-out and cause another leak.
Replacing the Shrub Irrigation Tube
If the leak comes from the tubing that runs between the faucet and the sprinkler heads, you may need to replace it. You can do this in a few steps:
- First, shut off the water supply.
- Next, take off the faucet head and unscrew the old tubing. Make sure the threads are clean before you screw the new tubing on.
- Finally, turn the water back on and test your sprinkler system. Unfortunately, you can’t repair a leaky sprinkler faucet.
Mending a Sprinkler Valve
If a leak comes from the sprinkler valve, you’ll want to fix it as soon as possible. If the valve is old, you may want to replace it altogether. If the valve is still in good condition, you can repair it by cleaning off the threads and replacing the O-ring.
You can also use plumbers’ tape to seal the threads and prevent leaks from happening in the future. When you clean or repair a sprinkler valve, ensure you’re shutting off the water first.
Conclusion
Sprinkler systems are large, intricate pieces of equipment prone to breaking down. Luckily, though, they’re also pretty simple to fix. The best way to deal with a leaky sprinkler is to catch it early. Once the water has started to seep out of the sprinkler system, the damage will be done.
If you notice a leak, turn off the water supply, locate the problem, and fix it as soon as possible. With a little effort, you’ll be able to repair a leaky sprinkler and get the sprinkler system back up and running in no time.